Chaos Unleashed is an expansion to the Exterminatus co-operative PvE mode, playable as Chaos Space Marines instead of Space Marines. It was released as paid DLC in December 2011.
In this update, players take fight to both the Ork horde and Imperial Guard forces. It includes new boss rounds, new arenas and new enemy units like the Sanctioned Psyker.
Description[]
The premium add-on pack, which has a cost of 800 Microsoft Points / $10.00, includes a new Exterminatus mode called Chaos Unleashed. In this update to the popular co-op mode players will take on the role of Chaos Space Marine as they take the fight to both the Ork horde and Imperial Guard forces. With brand new boss rounds, new co-op arenas and new enemy units like the Imperial Sanctioned Psyker this mode is a must-have for players looking for a new challenge.
As well as the Chaos Unleashed Mode, the Space Marine add-on pack also includes three new multiplayer maps – Habs Ablaze, Station Tertius and Aquila Canyon – which can be played in all multiplayer game modes. The pack also includes ten new achievements and trophies.
Wave description[]
Note: players will spawn in the north, so keep that in mind
- Wave 1
The first wave starts with Gretchin spawning on the northern side of the bridges and Guardsmen equipped with lasguns on the southern part of the map. The Gretchin will move south to attack the Guardsmen, but they will rarely actually kill them. When a sizeable amount of both has been killed, Slugga Boyz will spawn in the north. Guardsmen won't spawn for a while. At the end of this wave two new groups of Guardsmen with Lasguns will spawn, but there will also be specialists equipped with Melta Guns. In the north new Slugga Boyz and Gretchin will spawn. This wave is very easy, but the Melta Guns can be devastating up close if not killed quickly. Also, the Guardsmen are much less wide than Orks, making hitting them in ranged more difficult.
- Wave 2
An Imperial Guard-only wave. Guardsmen with Lasguns will spawn in the north, alongside the first Psyker. Most Psykers will spawn with a small group of Guardsmen. Later in the wave, the first melee Guardsmen, equipped with Chainwords, spawn, alongside more Psykers and Guardsmen. This wave can be challenging for new players and especially for Raptors and Havocs, since the Psykers will break most melee combos while the melee Guardsmen can stagger Havocs (others too, but they are more mobile generally), leaving them open to the powerful but static beams of the Psykers.
- Wave 3
This wave is the first relatively difficult one. Orks will spawn in the south and Guardsmen in the north. The Orks will consist of Slugga Boyz, Gretchin and Shoota Boyz, with the latter spawning in large groups of 3 or 4. The Imperial Guard will be a mix of Psykers, Lasguns and Chainswords. Only the melee units will cross the bridges and will attack the other race. This wave can be challenging due to the large amounts of ranged power with some crippling melee units, but staying either in the far south or far north will shield the players from the combined power of the 2 races, while the melee enemies will attack each other.
- Wave 4
The first Seize Ground wave. It is Imperial Guard only, so they will focus their full power on the players. The point is located in the southeast, near the exit, on higher ground. The hill has 2 approaches, on from the north and on from the southwest. Initially, Guardsmen will spawn near the the northern approach, a well armed force consisting of Lasguns, a Psykers and multiple specialists (Melta and Melee), making a static defense somewhat difficult. A short while after, Guardsmen will spawn in the southwest, again consisting of multiple hostiles. However, the first specialists with Grenade Launchers will also spawn there, and though not very accurate, their grenades will make holding the point even more difficult. One or two Raptors will usually do to neutralize all close quarters enemies, while they can also wreak havoc on the 2 Imperial Guard strongpoints.
- Wave 5
This is by far the most difficult wave of the first arena. At the start, Skar Boyz, Slugga Boyz and Shoota Boyz will spawn in the south, while the Imperial Guard will again be spawning in the north, with Lasguns and Psykers, but also a good close combat force. Again, especially the Orks are dangerous, but staying a distance away from the fight and attacking with ranged force is a good solution. At the end of the wave, when about 10-15 enemies remain, the Imperial equivalent of the Ork Nobz will spawn: Ultramarines. 3 of them, equipped with Bolters and Power Axes. They are about the same strength as Chaos Space Marines, do a decent amount of damage and their armor is resistent to bolt-based weapons, but they are vulnarable in melee and require only a level 3 (attack, attack, stun) stun to be stunned. This round can be especially dangerous to players equipped with light weapons and it requires a good mix of weapons, but a generally 1 Thunder Hammer or 2 Melta or Plasma-based guns will be enough to counter the heavy infantry.
- Wave 6
The first wave in the second arena is mostly a massive war between the Orks and Imperial Guard/Space Marines. Both will be present with both light and heavy infantry, with the Orks in the west and the Imperium in the eastern building and on the southern walkway. The Orks will spawn both on the roof and inside the building on the west, but most melee will spawn on the ground and most ranged units on the roof, but the ranged Orks will jump to the ground if a player comes to the roof. Skar Boyz will move to the west to attack. The Space Marines (2 up, 2 down) in the east carry Plasma Cannons, making them very dangerous in the little amount of space available, both on the ground and the top floor, and especially Raptors can easily be killed by one while attacking the other one. The Guardsmen will be equipped with Lasguns, Chainswords and Grenade Launchers, with the latter also being dangerous in the small building. On the walkway in the south, Guardsmen with Lasguns and Melta Guns will spawn, alongside a Psyker. The Psyker will stand above the stairs in the southwest, while the Melta Guns will move down to attack the Orks. As mentioned earlier, the Plasma Cannons are very dangerous, while the middle is a dangerous place to be, since both races will clash there and attack players. Bringing heavy weapons is much more important in this arena.
- Wave 7
A mixed wave with melee Orks and mixed Imperial Guard/Space Marine. The southern walkway will be very crowded with Guardsmen and Plasma Cannon Space Marines very quickly, but Raptors will easily deal with them. At first, only Imperial Guard (Guardsmen, specialists and a Psyker) will spawn in the middle, but after a good portion of them has been disposed of, the first Orks will spawn: a combination of Slugga and 'Ard Boyz and soon after that Skar Boyz. From the south, more Imperial Guard close combat specialists will move in. No ranged orks will spawn and the eastern building will be mostly empty, so staying in the north or in the eastern building is safe, but be careful for the Lasguns and Plasma Cannons firing from the south.
- Wave 8
The second Seize Ground wave of the Chaos Unleashed scenario. The goal is to capture 2 points on the top floor of the eastern and western building. The wave is mixed, but Orks will focus on the western building while the Imperial Guard spawns under the top floor of the eastern building. An awful lot of ranged Orks, consisting of Rokkit Boyz, Shoota Boyz and Shoota Nobz, spawn in the south, both on the walkway and below it, taking positions with a good overview of the map, making taking cover somewhat difficult. Also, an occasional 'Ard Boy will spawn, attacking the western point. The Imperial Guard will spawn on the ground underneath the eastern point, with Lasguns, Meltas and Chainswords and even a Psyker. They will move up the stairs and try to gain a foothold, so be aggressive when holding the eastern point. After a while, even a few Space Marines with bolters will spawn and move up. This wave can be very difficult if one decides to freewheel, but a few tricks will make it very easy. The western point is under very heavy pressure from the orks, but there is a safe spot, behind three crates, where one must only deal with the 'Ard Boyz and occassionally a few lost rockets, but 1 Raptor or Tactical Melta will have a very easy time, so the other players can hold the eastern building. The eastern top floor is best hold by letting 1 close range player hold the stairs, while the other 2 assist him and switch places with him if necessary. When both points are captured, carefully take out the remaining forces, because they can still be devastating. Sniping and area-of-effect weapons can clear the way for Raptors to attack, but play safe.
Strategy[]
Final arena[]
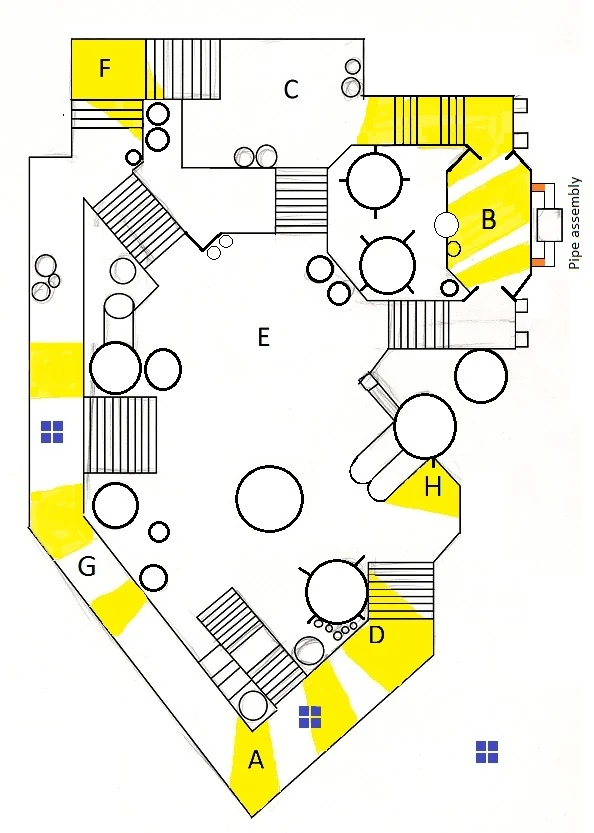
Map Key:
- Yellow: Areas that provide line of sight from the Killa Kans in the center
- Orange: The safe area of the pipe assembly
- Purple squares: Known enemy spawn points for the bonus wave
Suggested loadouts[]
- Tactical: Plasma Gun, Melta (Weapon Versatility) + Larraman's Blessing
- Tactical: Plasma Gun, Melta (Weapon Versatility) + Improved Melta Charge
- Assault: Plasma Pistol, Daemon Maul + Killing blow + Sure Strike
- Assault: Plasma Pistol, Daemon Maul + Killing blow + Air Cooled Thrusters
- Assault: Plasma Pistol, Daemon Maul + Inpenetrable + Air Cooled Thrusters
- Assault: Plasma Pistol, Chain Sword + Inpenetrable + Swordsmans Zeal
- Havoc: Lascannon + Ammunition stores + Iron Halo or Artificer Armor
- Havoc: Lascannon + Feel No Pain + Iron Halo or Artificer Armor
- Havoc: Lascannon + Las Cannon Capacitors + Iron Halo or Artificer Armor
- Havoc: Lascannon + Artificer Armor + Iron Halo
Kill order[]
- Bomb Squigs
- Shootas
- Melee
- Killa Kans
Wave 16[]
This wave is fairly easy, nothing really needs to be covered here save to say get your group to Bravo towards the end of the wave.
Wave 17[]
Wave 17's objective is to capture point Bravo. You and your teammates can capture B while standing at the southern and northern outskirts of the point [example] doing so will allow you to beat back the incomming wave before they are upon you.
Wave 18[]
Also known as Wave "GET TO GOD DAMN COVER!!!" an absurd amount of shoota nobz will spawn at Echo. It is best to stay at Bravo. You will have some orks spawn at the north and south entrances to bravo - mostly choppas, sometimes a squig, but they are easy enough to melta down.
Wave 19[]
Wave 19's objectives will be capture points Charlie and Echo. It is my personal perference to capture Charlie first as a group (if not as a group, have an assault up near echo acting as a bit of a distraction and taking out units who are ranged. The majority of enemies that you will face while capturing charlie will come from echo - so focusing on those stairs is key. Keep an eye on the few spawns that will come from bravo, it is always best not to get flanked. Make sure to stock up on grenades, once you get up to echo you'll need them to stun nobs and clear the point. I suggest getting to Charlie/Delta by the end of it.
Wave 20[]
This wave starts fairly light with imperial guard and then proceeds to ramp up into a disturbing amount of unimaginatively armored ultra marines. The las cannon/plasma cannon space marines all spawn near bravo (which is why it is best not to be there...) You will towards the end of the wave have to deal with about 6 ultra marine champions weilding thunder hammers. It is best to run them in a circle around the area of delta or to draw them down the walk way towards Golf .
Wave 21[]
This is it, the big win. From what I can tell this wave is made up into 5 discernible mini waves, initiated by the death or damage of an ork killa kan.
- Wave part A - Wave A starts with an ork killa kan being spawned on Echo. The wave truly begins once the killa kan is damaged enough to do a "damaged" animation. There will be no nobs during this wave, just a bunch of slugga boyz and rokkit boyz, it isn't too rough. just make sure to stay mobile and stay near delta.
- Wave part B - At 25% of the way through the trash, 'ard boyz will start spawning along with some squigs
- Wave part C - At about 50% of the way through the wave you will reach a point where only the Killa Kans are alive - in order to start the next part of the wave you need to damage them to a certain point. then...NOBS!!! they will start spawning, and they spawn in ALL OF THE BEST SPOTS TO HOLD UP AT - to make matters worse, they spawn with squigs. Your best bet is to hold up as a group at delta - once all the nobs are cleared out get half your group to bravo, make sure you have an assault there as an insurance policy
- Wave D - At 75% Initiated by the death of a killa kan. Groups of nearly everytype of ork will spawn(to include the elite nobs), priority on burning down squigs.
- Wave E - At about 90% completion the final wave spawns, grit your teeth it is about to get good! you'll get a semi small wave of elite nobs. this is an endurance test, just out last them, play it safe and you will beat this, nothing else will spawn and you will simply need to clean up the killa kans in the center to end it!
An important note for assaults! (This is a BIG DEAL) There is only one spot that is totally safe for an assault, a place where they can regenerate and there is no angle they can be shot from. East of point bravo there is a pipe assembly, if you jump pack ontop of the pipes and follow them down towards the water you can hide there indefinitely - it is effectively the only "safe spot" on the map available to you - I have it marked as orange.
A bit of an exploit: Normally, kans wont walk to H, not even if someone is standing at delta - HOWEVER -Killa kans will walk to H if someone is standing there, once they get to a certain point they will turn around and not attack until they've returned back to the middle... This is a good way for assaults to get their melee licks in on killa kans.
Gallery[]
")
")